Simpled EF-SP Smart Lock
Modern Security, Simplified Access
Original HubSpot URL: https://learn.simpled.uk/simpled-ef-sp-smart-lock
Unlocking Methods
Outside: Smartphone, Apple Watch, Fingerprint, Passcode, Proxy Fob, NFC, Emergency Key
Inside: Smartphone, Remote Controller, Alexa/Google Home (with gateway)
What's Included?
2x Proxy Fobs
1x Phone Tag (Sticker)
2x Emergency Keys
4x Alkaline Batteries (1.5V)
1x 60mm Spindle
1x Split Pin
2x Sliding Screws
2x M5x30mm Screws
2x M5x40mm Screws
4x Mortice Screws (for Wooden Door)
4x Mortice Screws (for Aluminum Door)
1x 80mm Spindle
2x Screw Stubs (30x8)
2x Screw Stubs (35x8)
2x Rubber Gaskets
Specifications
Model: EF-SP
Material: SS304 Handle and Panel
Weight: 2 KG
Colour: Silver, Black
Battery: 6V/4 x AA
Data Capacity:
100 Fingerprints
150 Passcodes
200 RFID Cards
Unlimited eKeys
Working Temperature: -10°C to 55°C
Weatherproof: Yes (for outdoor use)
Installation Instructions
Mortice Installation
ONLY REQUIRED IF you have ordered a separate new lift to lock mortice from us instead of using the existing multi point mechanism on your door.
Install the replacement lift to lock mortice
Insert Mortice into the door, ensuring it is aligned correctly.
Align the lock mechanism with the door’s pre-drilled holes.
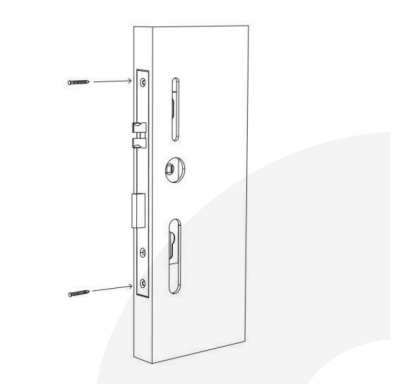
Screenshot 2024-11-22 at 13.48.53
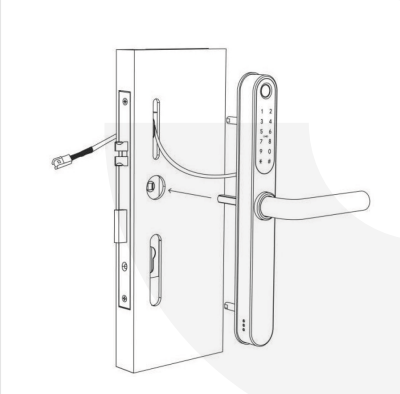
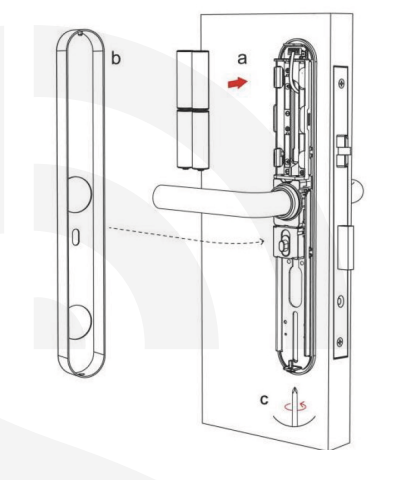
Step 2: Install Sliding Screw Casing and Square Shaft
Insert the screw into the hole and secure it.
Ensure the spindle receptor arrow is pointing towards the handle. If the handle is on the left, the arrow should also face the left.
Screenshot 2024-11-22 at 13.49.01
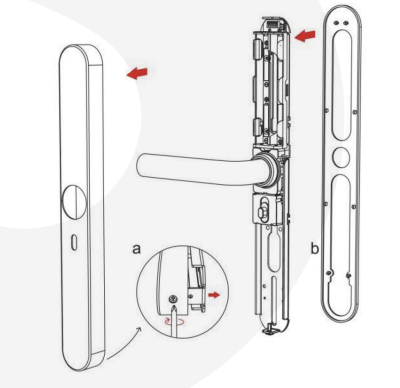
Step 3: Install Front Panel
Align the front panel with the door holes and install.
Install waterproof gaskets for additional protection.
Install the square shaft and secure it with a U-Clip.
Screenshot 2024-11-22 at 13.51.50
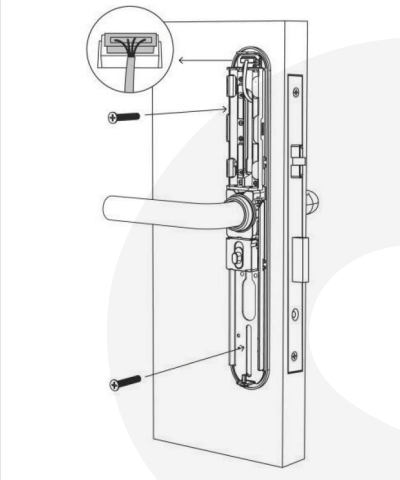
Step 4: Install the Back Panel
Install another waterproof pad on the rear panel to ensure sealing.
Screenshot 2024-11-22 at 13.49.12
Step 5: Connect the Front and Back Panels Wires
Connect the power cord from the front panel to the back panel.
Screenshot 2024-11-22 at 13.54.18
Step 6: Install the Battery
Insert 4 AA batteries into the battery compartment.
Attach the battery cover to complete the setup.
Screenshot 2024-11-22 at 13.54.42
Testing and Final Adjustments
Test Handle:
Lift the handle to engage the bolts/hooks.
Pull the handle down to disengage them.
External Handle Test:
Pull the outer handle down; it should move but not engage.
Insert the keys and turn them. When lifting the handle, the bolts/hooks should retract.
Final Notes
Auto-Lock Feature: The spindle will not engage from the outside unless verified (fingerprint, passcode, etc.).
Multi-Point Locks: Always lift the handles to ensure the multi-point bolts/hooks engage fully.
Cleaning: Use a soft, damp cloth for cleaning. Avoid chemicals to preserve the finish.
For Further Information don't hesitate to contact us here!